| Task 1 | Task 2 | Task 3 | Task 4 | Task 5 | Task 6 | Task 7 | Homework Tasks |
Design Project
1 3D CAD
Learn It
- You'll need to design the parts of your housing in SolidWorks.
- If you're not a confident SolidWorks user, these videos will walk you through building a quick letter rack using the basic design tools.
This video will talk you through the basics of making a 3D part. Watch it and follow along.
This video shows you how to use Shell, Flex and add a hole for the toggle switch. Please note the hole should have added after the flex.
This video shows you how to make spheres and hemispheres and add a hole for wires etc.
This video shows you how to use linear patterns and the text tool
- To convert your 3D design to 2D design for the lasercutter, watch this video.
- To help you with creating the acrylic part for the sample box
- Click on this link to go back to the year 7 cam box project. Towards the bottom of the page, you will find instructions to help getting images from Google and placing them into TechSoft 2D Designs. There are also instructions on changing the size of the image, vectorizing and contouring the images.
Design It
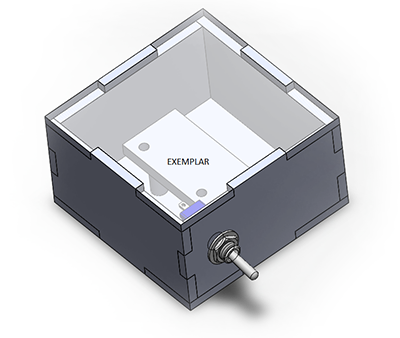
- Design the housing for your light.
- The PCB: Although you've not designed it yet, experience tells us that your circuit will be around 3mm X 25mm X 20mm (HxWxD). It's probably a good idea to design a small rectangular part this size, so that you can check later on that it'll fit inside your model. Don't worry about including holes to mount it yet (you can see some in my example at the top of the page) - we'll add these once you've designed your board.
- The Switch: You'll want to use a small toggle switch to turn your light on and off. One of your side walls will need a hole with a 3mm radius (6mm diameter) in it for the switch to stick through. SolidWorks is a very popular program around the World, and many other engineers and designers have created detailed parts which they have shared with others. As it happens, you can download the switch you'll be using here and insert it into your assembly. TIP: Once you insert the switch, make sure there will be some space for the wires to to PCB to go. You don't need a lot, but you don't want the back of the switch touching the PCB, for example.
- Power wires: Are you going to store your battery inside the housing (more portable), or outside (for easy battery changing)? If you want it external, you'll want to include a 1.5mm radius hole somewhere on one of the side walls.
Want to make some really exotic? Click here
- There is another online option to help you design a box Makercase which can be used to design a box. Watch the video below for some help.
Badge It
- To complete the badges you will need to click on the link at the bottom and complete the quiz. This will automatically badge your work.
- You will need to be logged into www.bournetolearn.com to complete the badge.
- You will also need to upload the screenshots of your mated parts, along with the quiz for this badge.
- Click on this link 3D design
- Silver: Design and mate together at least two fully defined parts in an assembly.
- Gold: Include finger points in your assembled model parts.
- Platinum: Create a fully defined complete design.